Aunt Edna's Heirlooms
These hints are generally in the order that the corresponding enigmas appear on the [icon-Final] sheet (to help navigate this page).
The combination to the lock is written in the letter from the law firm in regular plain numbers.
The combination to the lock is the 4-digt zip code (real zip codes are 5-digits) in the lawyer's address on the upper right part of the letter, which is also in bold text: 6060.
There is a Tea Towel / Kitchen Towel with this cup icon faux embroidered on it, and it also has a cross stitch pattern that looks like a grid. The grid includes long thin grey rectangles of 2 rows. Each of these rectangles is a 2 digit number. The first (upper) 'X' corresponds to the column of the first digit, and the second row is second digit. The minimum number depicted is 01, and the maximum is 22. There is also a useful wooden ruler included in the deposit box.
The two-digit numbers directly correspond to a letter. 01=A, 02=B, etc. The wooden ruler makes an easy cheat sheet for this substitution code.
The Xs in the grid indicate: 08 01 22 05 0 08 15 20 20 05 01. Substituting the corresponding letter spells out: HAVE A HOT TEA.
Enter this on the [icon-Final] sheet.
There is a piece of paper with a scribbled out message inside a prescription pill bottle with this exact symbol, but there is also another item in the box with a similar logo on it.
The second item you need is the lighter, inside the first aid zip, and then inside the purple pouch. Use the lighter and the piece of paper together to reveal the code. Follow the instructions on the side of the pill bottle.
If needed, here is a video of the process described.
When the lighter is held under the paper, the paper will warm up and the heat-sensitive ink will disappear. When the scribble disappears, text is revealed reading: DON'T EVER TAKE A FENCE DOWN UNTIL YOU KNOW WHY IT WAS PUT UP.
Enter this on the [icon-Final] sheet.
The wooden cat puzzle box is opened by lifting the white stick straight up. Then the cat head slides sideways. Then the insert lid lifts up. The body compartment is much the same. The head contains a piece of paper printed with a clue. The body compartment contains a treat to eat.
There is a piece of paper inside the head of the cat puzzle box that shows a Jazzercise instructor schedule with a colorful shoe icon. But really, it's a code. The key is the white stick with colorful stripes that holds the cat puzzle box together.
In the the top row of the grid, take the letter in the color that corresponds to the top row of the white stick with color stripes (purple). Then, in the second row of the grid, take the letter in the pink color, etc.

Taking the corresponding letter from each row should spell out: REAP WHAT YOU SOW.
Enter this on the [icon-Final] sheet.
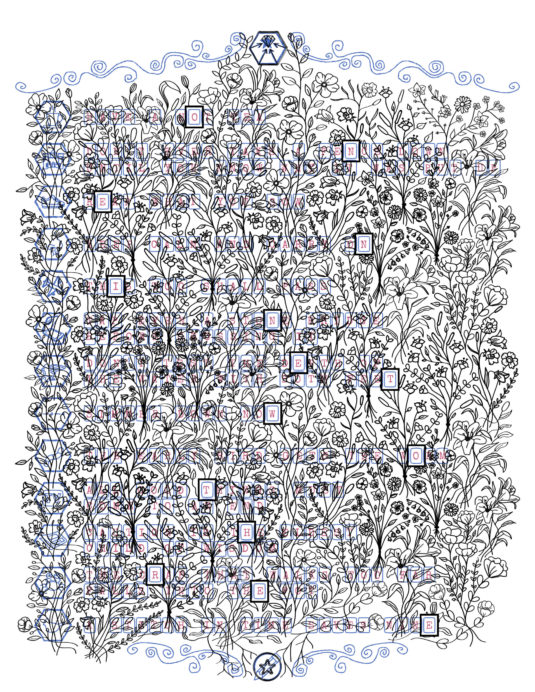
These icons are found in two locations: On the loose laminated piece of paper (It has phrases and [icon-Alpha][icon-Beta][icon-Delta][icon-Gamma] and flower pattern on the back), and on the bottom of 4 plastic black/clear containers of potpourri (which you can find inside the black and grey zipped, square-shaped case, which is also inside a ziploc baggie).
The little plastic container labeled with this sticker on the bottom contains potpourri that smells like Vanilla.
The little plastic container labeled with this sticker on the bottom contains potpourri that smells like Eucalyptus. Sorry about the ambiguity with similar smells, like menthol. The word game will help narrow it down.
The little plastic container labeled with this sticker on the bottom contains potpourri that smells like Mint. Sorry about the ambiguity with similar smells, like spearmint and wintermint. The word game will help show that it's really just, 'mint'.
The little plastic container labeled with this sticker on the bottom contains potpourri that smells like Lavender.
These letters appear next to each digit on a combination lock, and they also appear on a loose card of paper that is laminated and has a floral pattern on the back side. The piece of paper, along with the potpourri containers, will indicate the values for each digit.
The letters of the scent should be subtracted away from the starting word, "Navigate Hill". The remaining letters are used to determine the value of [icon-Alpha].
"Navigate Hill" minus the letters in "Vanilla" equals = GTEHI. Note the symbol on the sheet showing 'scrambling'.
GTEHI is an anagram of Eight (8).
"Uneasy Couplet" minus the letters in "Eucalyptus" equals = NOE. This is an anagram of One (1).
"Hermit Net" minus the letters in "Mint" equals = HERTE. This is an anagram of Three (3).
"Hermit Net" minus the letters in "Mint" equals = OWT. This is an anagram of Two (2).
Using the digits from [icon-Alpha], [icon-Beta], [icon-Delta], [icon-Gamma], enter the code 8132 into the combo lock. This unlocks the top of the lock, but also allows a compartment in the lock to swing open. Inside is a piece of paper.
The piece of paper inside the large black combination lock contains a (hopefully) familiar phase and logo:

Keep Calm and Carry On was a motivational poster designed by the British Government during World War II, but it became wildly popular in ~2012.
Enter KEEP CALM AND CARRY ON on the [icon-Final] sheet.
[icon-Spoon1] [icon-Spoon2] [icon-Spoon3] [icon-Spoon4]
These tags appear on 4 collectable spoons wrapped up in a light blue felt holder.
Each of these spoons is from a specific city:
1) San Francisco
2) Houston
3) Tampa
4) Las Vegas
Next, the piece of paper inside in the plastic tube with flower patterns is needed.
[icon-Vial]
The piece of paper inside the plastic vial has spoon and airplane icons. This paper will be refilled with a fresh piece of paper, so don't worry if it crumples on the way out of the vial. Together with the cities that each spoon is from, this coded message can be deciphered. The airplane is a hint.
[icon-Plane1]
The major airport in San Francisco (from the corresponding spoon) is San Francisco International Airport, aka SFO. Enter SFO in the 3 boxes.
[icon-Plane2]
The major airport in Houston (from the corresponding spoon) is George Bush Intercontinental Airport, aka IAH. Enter IAH in the 3 boxes.
[icon-Plane3]
The major airport in Tampa (from the corresponding spoon) is Tampa International Airport, aka TPA. Enter TPA in the 3 boxes.
[icon-Plane4]
The major airport in Las Vegas (from the corresponding spoon) is McCarran International Airport, aka LAS. Enter LAS in the 3 boxes.
[icon-PlaneMain] 1
The cryptic message using just 1-4 and a-c is a substitution code for the letters you've entered in the boxes under the icons on this same piece of paper. So, 1a = S from "SFO".
[icon-PlaneMain] 2
1a = S, 1b = F, 1c = O, 2a = I, 2b = A, 2c = H, 3a = T, 3b = P, 3c = A, 4a = L, 4b = A, 4c = S.
Therefore, 3a2c2a1a 3a1c1c 1a2c4b4a4a 3b2b1a4c translates to: THIS TOO SHALL PASS.
Enter this phrase on the [icon-Final] sheet.
Two parts are needed to solve this enigma: One is a framed photo pf a female cardinal on a snowy branch and marked with this icon, and the other is a physical object that looks like this icon.
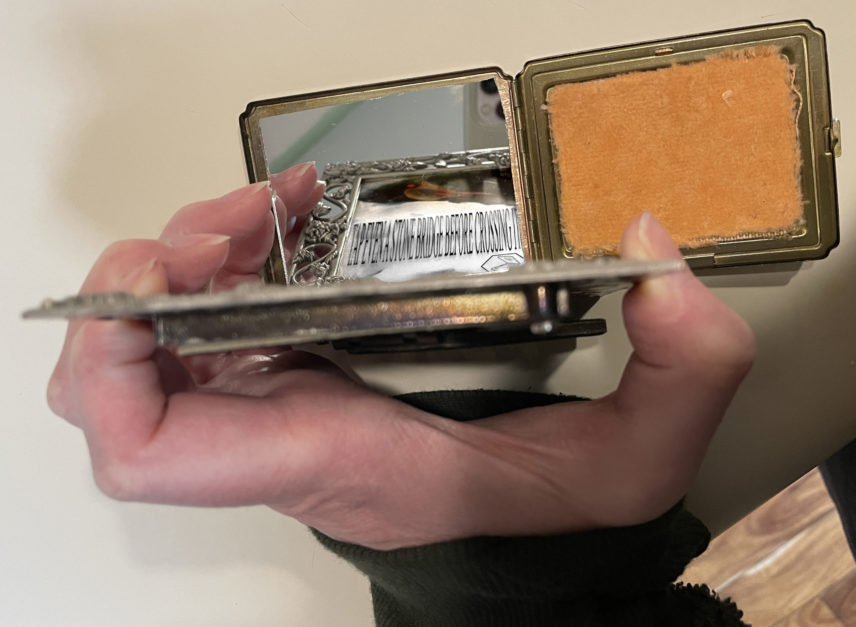
The vintage ladies compact opens to reveal a mirror. Holding the mirror up to the stretched text on the cardinal photo at an angle, flips the letters and also foreshortens the elongated text, making it readable.
It says: TAP EVEN A STONE BRIDGE BEFORE CROSSING IT.
Enter this phrase on the [icon-Final] sheet.
Inside the purple draw string pouch (an old Crown Royal bag), is a note with a numerical code marked with the eagle icon, and there is also a physical object in the pouch that resembles the icon.
The purple pouch contains a Little Orphan Annie Decoder Pin. Decoder pins were distributed by the radio program from 1935-1940, and codes would be read out over the air for kids at home to decode. This was made famous in 1983 by the movie, A Christmas Story. Young Ralphie has to drink gallons of Ovaltine in order to accumulate enough box tops to exchange for a decoder pin. Once finally able to decipher the secret radio codes for the first time, he is terribly disappointed to discover the message is just, "Drink your Ovaltine".
Decoder pins spin so that the substitution code is not always the same. In order to decode a message, the key-setting for the spinning pin must be known so the receiving person knows in what position the spinning disk should be set. The decoder pin included here can be a little tough to spin at first, but it helps to grip the pin back. The key-setting can take the form of any single number-letter combo. This indicates how to align the spinning disk. For example K21 would indicate that the disk should be spun such that K lines up with 21. From there, each number in the code can be decoded by just looking at the disk (and not spinning it any more).
There is a letter-number combination hidden in the small note inside the purple pouch. It is slightly bold. This is the key-setting for the decoder pin, and the coded message is on the back of the same note.
The numerical code is: 17,25,24,'5 5,12,3,5 5,15,12 17,12,1,5,15 25,16 5,15,2 23,10,5,12,26 23,19,5,15 13,25,5,15 16,12,12,5
The key setting is H15, so the decoder disk needs to be twisted until H lines up with 15. Then the code can be deciphered. With the decoder pin in the correct position, 17 matches up with D. 25 matches up with O. 24 matches up with N, etc. All together, it reads: DON'T TEST THE DEPTH OF WATER WITH BOTH FEET
Enter this phrase on the [icon-Final] sheet.
The orange metal tag on this blue crochet pot holder is a clue to the code. These symbols might look familiar to you in general, but there is also another object in the deposit box that has symbols like this. You can use that second object to solve the pot holder.
It is the blocks of crochet in between the holes that form the dots and dashes of morse code. See the next clue for a photo illustration. The wooden ruler shows the Morse Code system.
The wooden ruler has a Morse Code decoder engraved on it.
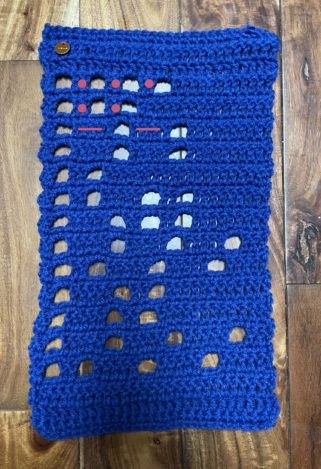
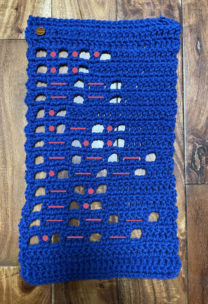
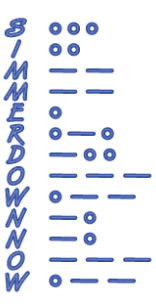
The crocheted Morse Code pot holder decodes to: SIMMER DOWN NOW.
Enter this phrase on the [icon-Final] sheet.
This is a 30 piece jigsaw puzzle that must be assembled without a photo of the final image. Another part of the challenge is that this is a 2-sided puzzle. Likewise, once assembled, it will help solve 2 enigmas: [icon-TV] and [icon-Worm].
Here are the assembled 2 sides of the jig saw puzzle:
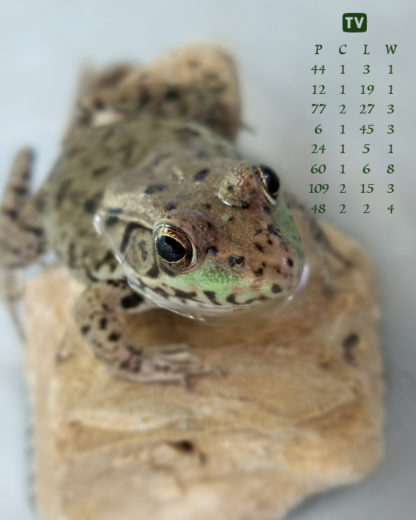
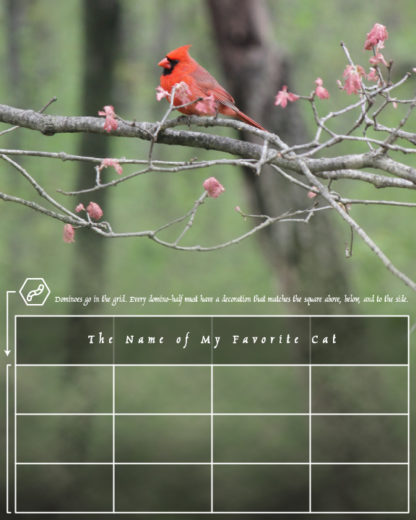
This enigma will require 3 different types of objects from the deposit box: 1) the jigsaw puzzle (assembled, cardinal side, and marked with this icon), 2) the transparent blue dominoes (which have a sticker on the bag with a picture of a puzzle piece), 3) the name of Aunt Edna's favorite cat (also mentioned on the jigsaw puzzle).
The 5X7 crystal framed cat photograph shows a worm-icon name tag on the cat's collar tag. But what is needed in order to solve the worm enigma is the name of the cat. Where might a person label the names of things in a photograph?
If you take the back off of the crystal frame (one of the tabs is marked in red to help draw your attention), you will see that the back of the photo has the cat's name, HIGGINS. (This is also the name of one of the main Characters in Magnum PI, a TV show staring Tom Selleck (cover of the TV Guide)).
One of the dominoes has a worm icon on it, just like the cardinal-side of the jigsaw puzzle, and the cat's tag in the framed photo. Lay the dominoes out on top of the assembled jigsaw puzzle. All the pieces should be sticker-side up, and with the letters facing the same direction. The top row of the grid you are assembling should spell Aunt Edna's favorite cat name, which hopefully is now known from the above hint.

Once the top row is filled in, there should be only one way to assemble the rest while following the instructions written on the jigsaw puzzle. There is no need to worry about matching patterns within a single dominoe (they are already formed as they are). Here are the top two rows as a start.

The final assembly that satisfies all the matching decorations is this:
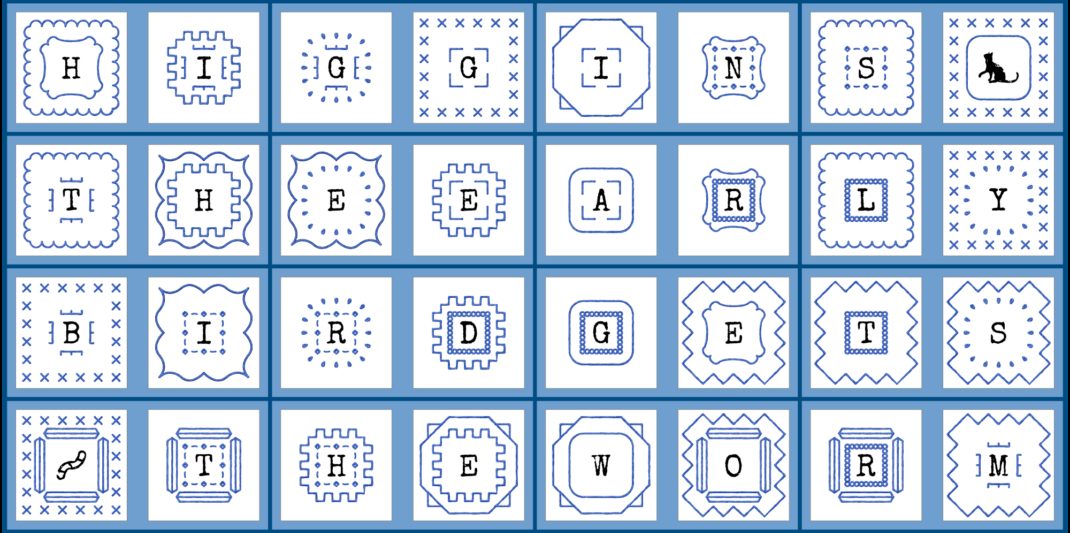
The dominoes read, THE EARLY BIRD GETS THE WORM.
Enter this phrase on the [icon-Final] sheet.
There are 2 items on the deposit box that you will need to solve this enigma: The TV guide from 1995 and the assembled jigsaw puzzle, frog-side (which has the TV icon on it). There is also a piece of cut out pink paper tucked in the TV guide, but this is actually part of a later puzzle.
The table of numbers under the TV icon on the jigsaw puzzle is a book cipher, with the TV guide magazine as the key.
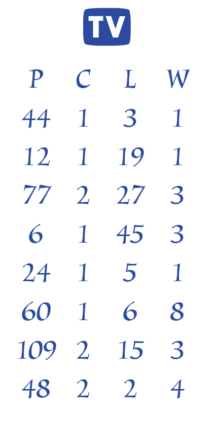
Each row is a word in a phrase. The first column (P) is the page number in the magazine, the second column (C) is the column number of text on the page, the third (L) is the line number (counting from the top of the page), and the forth one (W), is the word number (counting from the left).
Finding each indicated word in the TV guide should give you: ALL GOOD THINGS MUST COME TO AN END
Enter this phrase on the [icon-Final] sheet.
There is a newspaper clipping inside the check case/billfold. There is also a 3-digit-combo locked pencil case with a metal tag marked with a newspaper. The newspaper has the code to the pencil case.
The pencil case has a purple metal tag on it, marked with a newspaper icon. Look to the newspaper clipping (inside the Japansese-style check case) to find the lock combo.
There is only one 3-digit number on the newspaper clipping. This number is code to the locked pencil case, tagged with a newspaper-icon tag.
The 3-Digit combo number is 139, the number of spoons Edna Williams owned. Inside the pencil case are 3 objects, which are each used to solve a different enigma.
There is a red acrylic bird, a UV flashlight, and a pink paper cutout. They are used to solve [icon-Cardinal], [icon-Newspaper], and [icon-Crab] respectively.
The UV-flashlight obtained from the pencil case can now be used with the newspaper clipping to solve this enigma.
When UV light is shined on the back of the newspaper clipping, certain letters are highlighted.
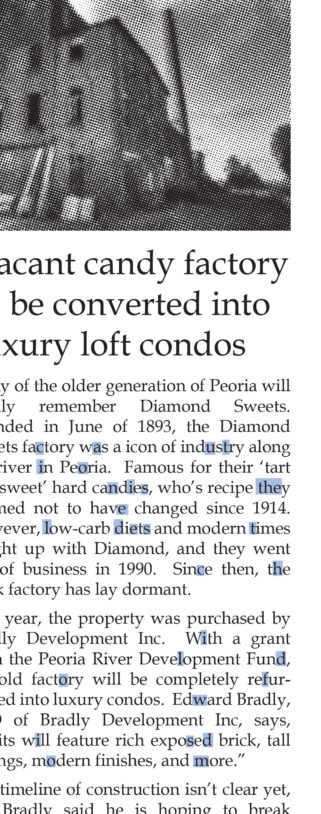
The glowing letters spell out: CAUTION IS THE ELDEST CHILD OF WISDOM.
Enter this phrase on the [icon-Final] sheet.
There are 3 parts to this enigma, hidden throughout the deposit box. Each one is labeled "1 of 3", "2 of 3", and "3 of 3." Other enigmas must be solved in order to open up compartments containing one of the cut outs.
There are 3 parts to this enigma. Each is a pink paper cutout, found in three different compartments within the deposit box.
One is in the checkcase/billfold.
One is tucked in the TV guide magazine (should be just inside the cover).
One is locked inside the 3-digit combination lock pencil case (Look to the newspaper clipping and [icon-Newspaper] to find the combo).
When the 3 layers of paper are stacked on top of each other in the correct alignment, you will see:
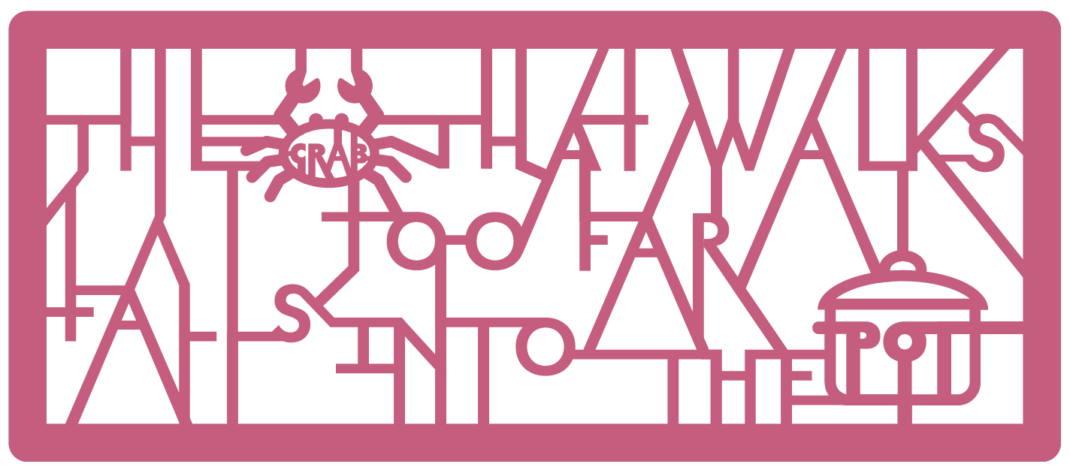
It reads: THE CRAB THAT WALKS TOO FAR FALLS INTO THE POT
Enter this phrase on the [icon-Final] sheet.
Two items are needed to solve this enigma, but one of them is locked inside a compartment that is dependent on another enigma being worked on first.
Two objects are used to solve this enigma: a colorful grid of pixels sandwiched between pieces of acrylic and taped around the edges with rainbow tape, and a red bird figurine with a flat red plastic stand. The red bird figurine is locked inside the pink and blue pencil case. The pencil case must be unlocked first in order to solve the [icon-Cardinal] enigma. The pencil case is part of the [icon-Newspaper] enigma.
As indicated by the pixelated icons on the back of the colorful image, the red bird figurine is inside the locked pencil case, which can be opened using clues from the newspaper clipping (as indicated by the metal tag on the pencil case).
The base of the bird can be placed over the colorful image. The red filter blocks out some colors, and a hidden message is revealed.
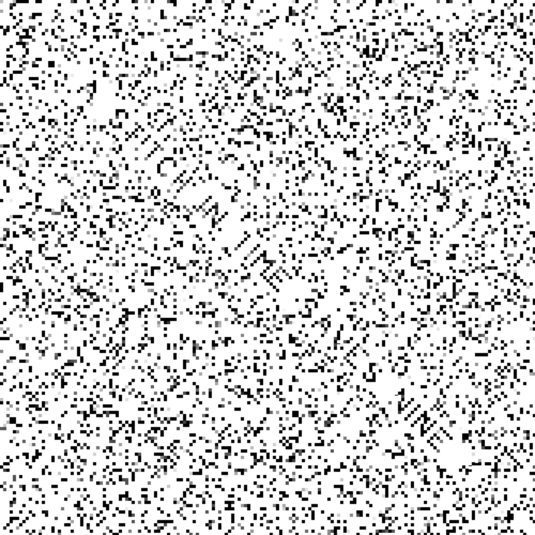
It reads: A STITCH IN TIME SAVES NINE
Enter this phrase on the [icon-Final] sheet.
The answers to all 13 enigmas should be written on this sheet:
[icon-Tea] = HAVE A HOT TEA
[icon-Castle] = DON'T EVER TAKE A FENCE DOWN UNTIL YOU KNOW WHY IT WAS PUT UP
[icon-Shoe] = REAP WHAT YOU SOW
[icon-Nose] = KEEP CALM AND CARRY ON
[icon-PlaneMain] = THIS TOO SHALL PASS
[icon-Mirror] = TAP EVEN A STONE BRIDGE BEFORE CROSSING IT
[icon-Eagle] = DON'T TEST THE DEPTH OF THE WATER WITH BOTH FEET
[icon-Morse] = SIMMER DOWN NOW
[icon-Worm] = THE EARLY BIRD GETS THE WORM
[icon-TV] = ALL GOOD THINGS MUST COME TO AN END
[icon-Newspaper] = CAUTION IS THE ELDEST CHILD OF WISDOM
[icon-Crab] = THE CRAB THAT WALKS TOO FAR FALLS INTO THE POT
[icon-Cardinal] = A STITCH IN TIME SAVES NINE
Placing the floral transparency over the filled-in final star sheet reveals highlighted letters. Read in order, they spell: ONE NINE TWO THREE.
FYI, This is also Edna Williams' birth year.
This is the 4-digit combination code to the lock box marked with [icon-Diamond].
Inside you will find Aunt Edna's legacy!
Need more help? Text: Seven Zero Eight, Four Two Six, 6 0 5 8 or Email: Kate@K8Baldwin.com
